
I was perusing Mary Jane Mucklestone’s 150 Scandinavian Motifs the other day, and I was struck by her steek setup.
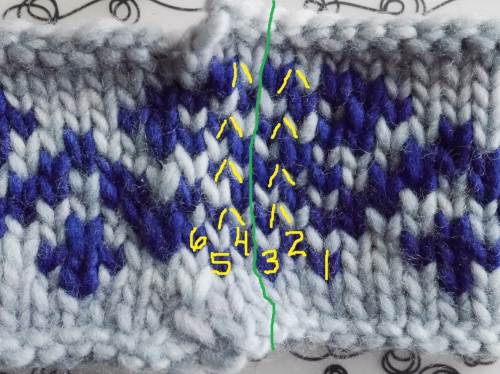
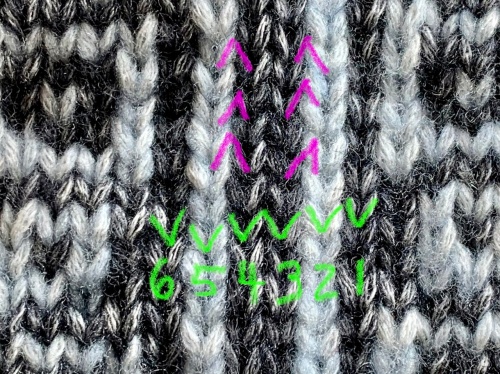
She uses a six stitch steek, but the two center stitches are the same color. This makes it clear where you cut: between the two stitches that are the same color. Easy peasy!
My first forays into steeking used a checkerboard pattern. I use single crochet to reinforce my edges. I’ve tried slip stitch crochet, too, but I like the way single crochet looks, better. Trial and error, right? The checkerboard pattern kept me on my toes, as far as seeing where to crochet my reinforcement; the color alternated with every stitch.

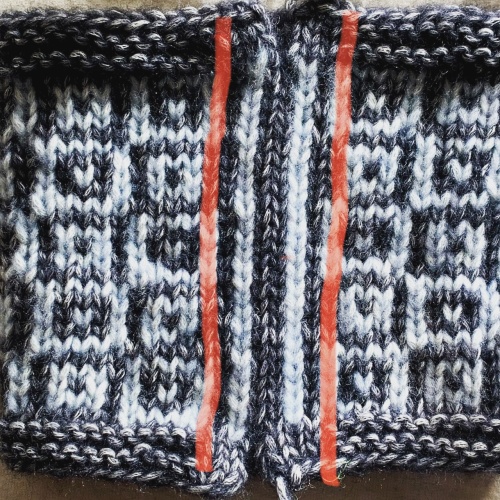
On my next steeking pattern, I decided to use striped columns, so I was always crocheting into the same colors. Better. But not symmetrical as far as the edge stitches go.
The double center line makes it super clear. Yes, it’s the same as far as crocheting under 2 different color legs, but this makes my heart go pittypat. In a good way. The steek edges are the same color, where I pick up my edgings, so they look the same. That’s a win for me. Symmetry! You can use whatever steek arrangement you like; I like this one best. So far…
If all goes according to plan, this pattern will be offered free via Craftsy/The Knitting Circle for a Live Event on Tuesday, November 30. I’ll keep you posted. I love these little projects for teaching, learning, and gift giving! And I’m glad I learned something, too.
Have you ever discovered a better way to do something, and it was so simple it made you laugh out loud?


Just seeing the word ‘steek’ has me running. The very concept sees me grimacing, Michele.
This is a low stakes steeks project! (Say that three times, fast.) Just a couple coffee cup coasters. No big deal. And free pattern, too!
> >
No, no: nothing in this world could tempt me to CUT something knitted – not even a free PDXKnitterati pattern !!! 🙂
YES!! I started knitting a double layer hat where you were supposed to do a temporary cast on at the brim, go up and then do your decreases to finish the hat and tie it off, then go back and pick up all of those live stitches. Now you knit the other way and then decrease for the hat again. Push one inside the other and you have a hat. Nice, but a big PITA with all the fiddling.
New way: start with 8 stitches, increase from there until you can measure gauge, and that gives you how many to increase total. Knit stockinette like forever, then do hat decreases and bind off. Push one end into the other and there you go. Double layer hat, but much easier! This better way is Ysolda Teague’s way. The hat pattern is expensive (to me, for a hat) but allows you to use any yarn including handspun, and make any size, child to large adult. All the math done, mindless knitting. Totally worth it.
YES! That sounds a lot easier.
> >
Yep!
Long tail cast on,, but with two strands (either a second ball of yarn, or the other end of the ball).
No more running out of yarn half-way through a big cast on! I wish I’d learned that one -years- ago!
I love that one! I only use it for shawls from the large end, though. I don’t mind re-doing the shorter cast ons if I get it wrong. LTCO is so quick!
> >
Don’t you love when you learn a technique or trick that makes your brain go “YES!!!” I have never steeked, but after working with Lopi, I can see how using the right yarn would make it less frightening.