Tag Archives: blocking tutorial

How to block a bandana cowl

I’ve been designing and knitting a lot of bandana cowls lately. This is a great shape to wear; it pops on over your head, and stays put. I love wearing these when I’m teaching; they don’t fall off when I lean over to look at a student’s knitting. But how do you block this shape?

Cosette

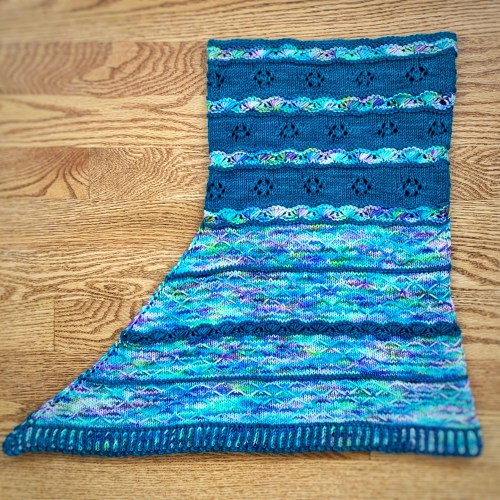
You could block it this way, but it will leave creases at the back neck and front.

Cosette, gentle blocking (not a hard stretch)

Using tubes of some sort, or rolled up washcloths, will keep you from getting creases as your cowl dries. This tall neck could probably have used a separate set of tubes for the cowl portion, separate from the triangle.

It turned out fine, though!

Starfall

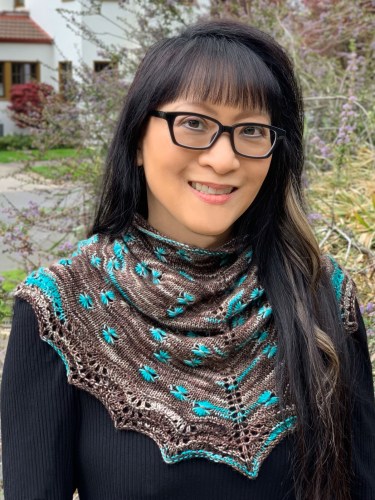
I upped my blocking game for my Starfall assigned pooling cowl, because it needed a more assertive blocking to set the stars and open up the lace border. Here’s the whole process.

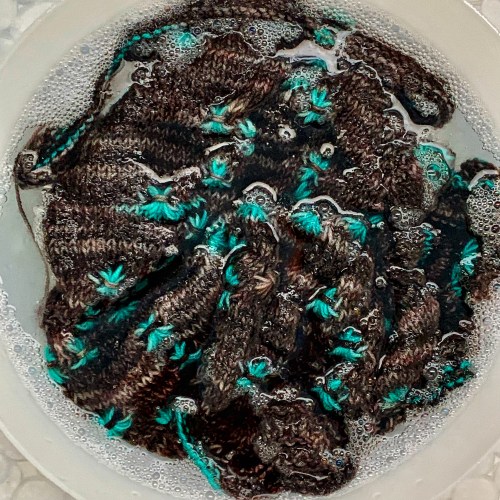
Soak cowl in cool water with a bit of no-rinse wool wash for 20 minutes. Gently squeeze out excess water (do not wring). Roll up cowl in a folded towel and walk on it (!) to remove more water.

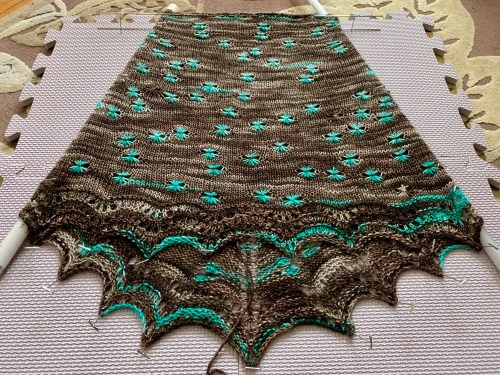
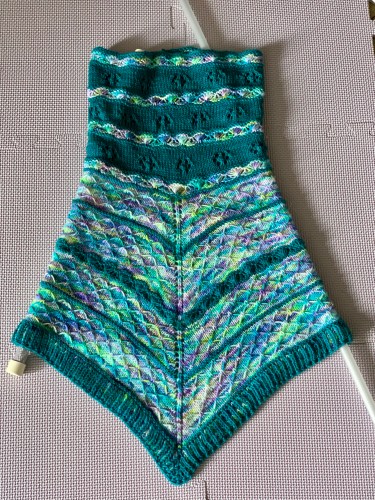
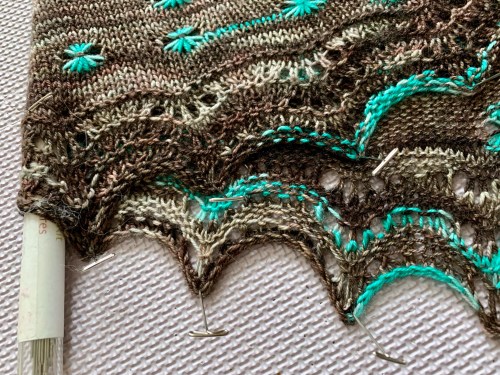
Block cowl to desired dimensions, pinning out scalloped lower edge. I also put wires along the neck edge to maintain a straight edge. It’s easiest if you lay it out with the triangle face down and the back of the cowl on top so you can pin out the scalloped edging of both the front and back at the same time.

Place tubes into the sides to avoid creases; I use the tubes my blocking wires came in. For this particular cowl, the center spine is the center front. The end of the bind off is the center back (it’s the arch of the scallop, not the point).

See how laying the cowl down with the back side up allows me to pin both the front and back scallops?

Starfall blocking, now front side up

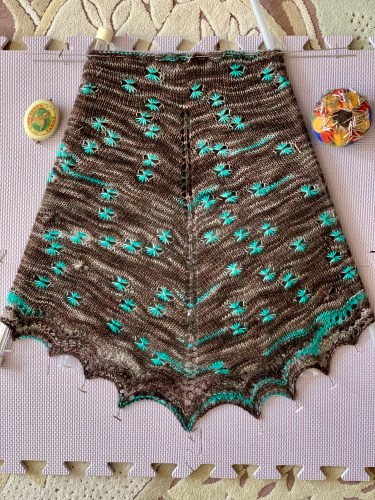
I usually flip my cowl over the next day to speed up drying; you can pin out the scallops on the just the front because the back will be dry already. Let dry completely. Sew in ends.

Have you blocked a bandana cowl before? Would you do it this way? I really like it!

Ebb and Flow

Blocking lace tutorial: magic!

Blocking is magic for lace knitting. You may think that your project is finished once it’s off the needles, but that’s when the fun really begins. The true beauty of lace doesn’t show until you go through the finishing step of blocking.

Some of us are finishing up our Garland KAL shawls. I’m blocking Garlands for a couple of my local KAL knitters, as well as my own. Here are a couple Garland Shawls before

Untitled

Untitled

and during blocking.

Untitled

Untitled

After:

image

image

image

Magic!

I thought I’d walk you through blocking on blocking wires, if you haven’t done it before. If you don’t have blocking wires, it’s also possible to do this using string in place of the wires (I’d use mercerized cotton, or linen), but I prefer the stiffness of the wires. Don’t weave in your yarn ends until after blocking. There’s going to be a lot of stretching going on.

Let’s get started!

First, I soak the knitted garment in the kitchen sink with a little bit of Soak, my favorite non-rinse wool wash. Use warm water and allow the garment to soak for at least 20 minutes to relax the fibers.

image

The garment is really saturated and stretchy at this point! Support it from underneath, and squeeze out as much water as you can with your hands. Do not twist or wring. Next, lay it on a folded towel, fold the towel over that, and walk all over it. Really. This will get most of the water out.

The next step is to thread the straight edges onto the blocking wires. I put the wires along the top edge, going over and under the garter ridges. If you have an especially long edge, you would use two or three wires to cover the length, but overlap the wires by an inch or so at the place(s) where they meet. I know that you may consider this top edge to be a curve, but it works fine to block it straight, and it’s much easier to pin out this way. Triangle shawls are straight along the top; heart shaped shawls can be blocked straight along the top, too. Crescent shawls like my Webfoot or Filigree? I like to pin them all around, no wires.

image

Now the fun begins. Stretch out the garment so that the lovely laciness shines! Use the metal t-pins that came with the blocking wires to hold the wires in place. You’ll need to be working on a surface that can take your pins. In the summer, I’ve been using my old Dritz cardboard cutting board on a table outside. The cardboard is getting tatty after being pinned a bazillion times, but it still works. In the winter, I block on a futon sofabed in the basement. There are also blocking mats that you can purchase specifically for this purpose, and I’ve seen knitters use foam interlocking alphabet blocks, too. (A useful child’s toy, but be careful, some of the colors may transfer to your yarn.) Knitter’s choice!

If you’re pinning out points, you run the wires through the points like this,

image

or you can pin each point out separately, like this center point.

image

I pinned out each point of my peacock green Garland, but only because I forgot that I could run wires instead! Wires are much faster to set up.

image

Let the garment dry completely, and then un-pin. Sew in your ends. The result? Instead of a crumpled wad of knitting, you have a diaphanous piece of gossamer loveliness.

Do you block your lace? Aggressively? I hope so!

Blocking lace

I just finished my fourth(!) Zen Rain Shawlette; this one was for the Knitalong (Rav link). Actually, number 3 isn’t quite off the needles yet; I’m in the middle of the very long bind off. But I thought I’d walk you through blocking on blocking wires, if you haven’t done it before. Blocking is magic for lace! (Don’t weave in your yarn ends until after blocking. There’s going to be a lot of stretching going on.)

First, I soak the knitted garment in the kitchen sink with a little bit of Soak, my favorite non-rinse wool wash. Use warm water and allow the garment to soak for at least 20 minutes.

soaking

The garment is really saturated and stretchy at this point! Squeeze out as much water as you can with your hands. Do not twist or wring. Next, lay it on a folded towel, fold the towel over that, and walk all over it. Really. This will get most of the water out.

towel

The next step is to thread the edges onto the blocking wires. I put the wires along the garter edges, going over and under the garter ridges. If you’re pinning out points, you run the wires through the points. This particular shawlette has a row of eyelets along the bottom, above the ruffle. A perfect place to thread blocking wires.

holey

If you have an especially long edge, you would use two wires to cover the length, but overlap the wires by an inch or so at the place where they meet. Now the fun begins. Stretch out the garment so that the lovely laciness shines! Use the metal t-pins that came with the blocking wires to hold the wires in place. You’ll need to be working on a surface that can take your pins. I’m lucky to have a futon sofabed in the basement, so that’s where I block. There are also blocking mats that you can purchase specifically for this purpose, and I’ve seen knitters use foam interlocking alphabet blocks (a useful child’s toy!), too. I’ve also used a towel over my cardboard cutting board that I use for sewing, but cardboard eventually gets tatty after being pinned a bazillion times. (Please excuse the lighting in my basement. It’s a basement! I played with the colors post-processing, but this is the best I could get it to look.)

pinned

Let the garment dry completely, and then un-pin. The result? Instead of a crumpled wad of knitting, you have a diaphanous piece of gossamer loveliness.

pink zen

This Rambouillet single bloomed a bit, and softened wonderfully after washing and blocking. I had two grams of yarn left when I was done. I knew it would be close! I’m a big fan of using my kitchen scale to keep track of how much yarn a row takes as I get close to the end of a project. I could have ended a row sooner if I needed to, but not a row later!

2 oz

Now to finish binding off Zen Rain #3, and then I get to block again! After that? Here’s my new project…I’ll tell you about it next time.

euroflax